Selling a Kirkland Condo – Staging and Photos

condo windows

Whether I am helping a client sell a house or a condo, my thought process is generally the same.

Start at “buyer profiling”. Who is likely to buy this property? Then make a list of the top 3 to 5 reasons why THAT person, whom you have targeted as the likely buyer, will choose THIS property over others that are for sale.

The first part, “buyer profiling” is an old method I learned when I was a Certified Corporate Property Specialist for Coldwell Banker back in the 90s selling vacant properties where the owner was relocated for job reasons. There is less of an emotional pull from the owner, and the process is more of a business effort to sell, with little to no accommodations for the seller’s emotional “triggers”.

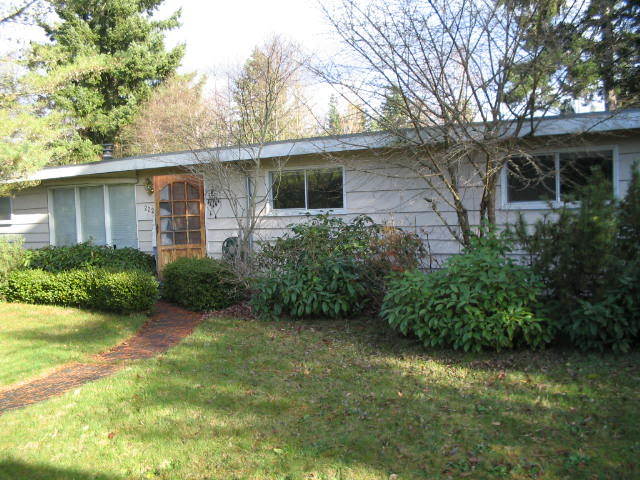
For this condo, which was sold about a month ago, I determined the individual would likely be a single professional person…or at least that would be the person who might pay the highest price for it. I also determined that the person (or possibly couple) would likely be younger vs older because there were a lot of steps up to the front door. Not likely an “empty nester”, as might be the case for a ground floor unit with no steps.

Next I listed the reasons why someone would choose THIS condo over the other 65 or so condos for sale in Kirkland at the time priced at $250,000 or less.

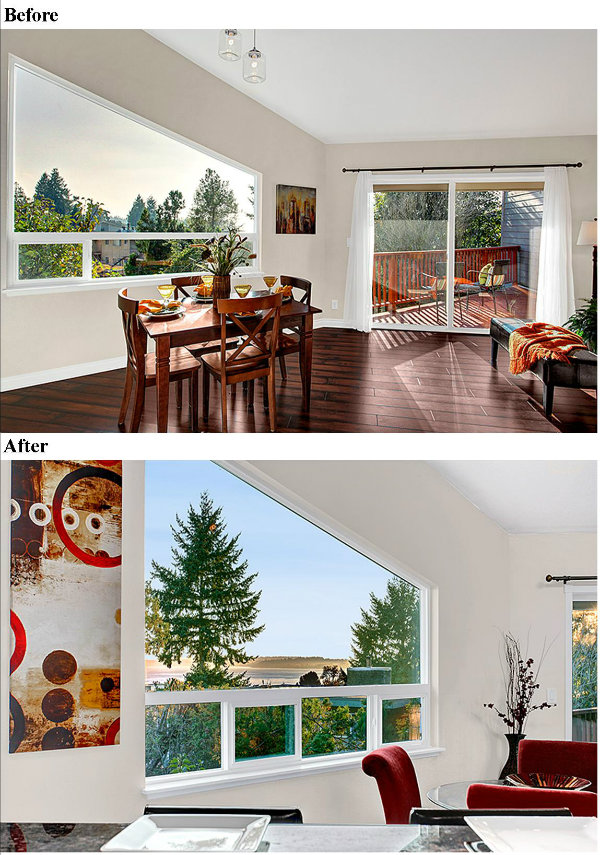
1) View of Lake Washington (only 6 of 65 have a view of Lake Washington)
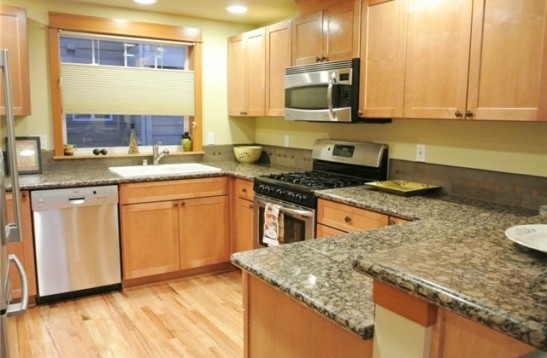
2) 1,000+ square feet (only 11 of 65 are over 1,000 sf)
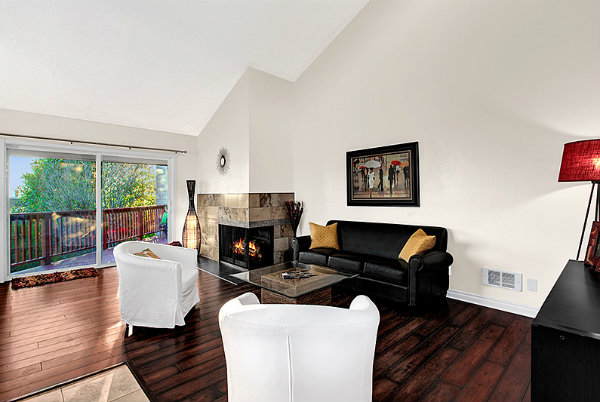
3) Super high ceilings on the inside interior walls of the main living space
4) Clerestory Windows at the top of the high ceilings
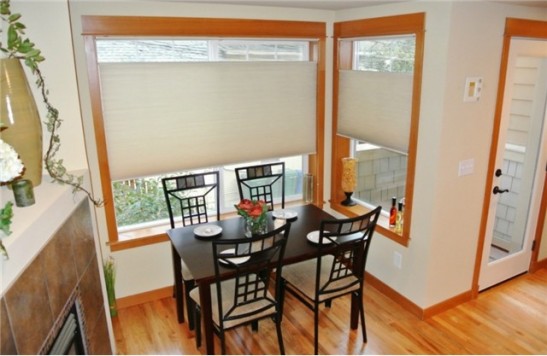
5) Travertine and “wood” floors vs carpet

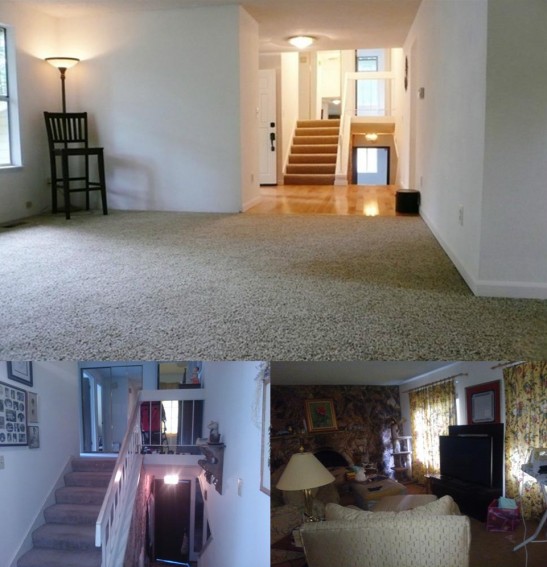
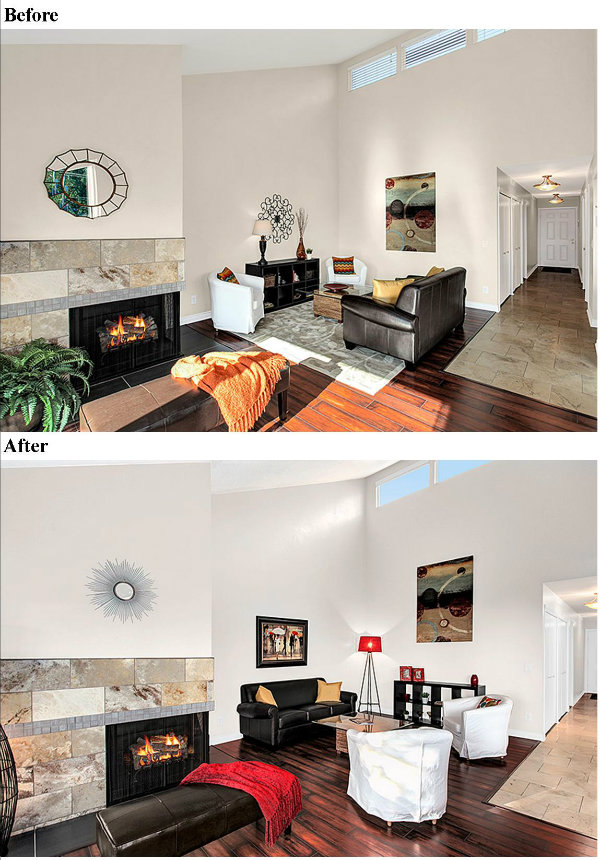
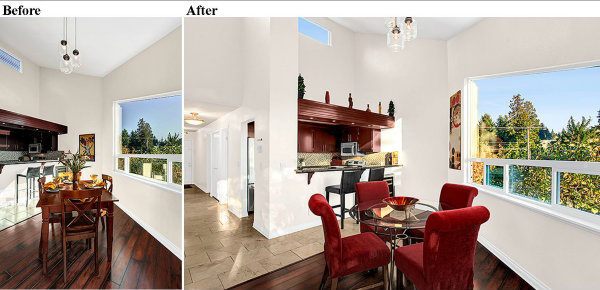
It is very important that you match your staging and photos to the main selling features of the property. NICE is not good enough. This particular condo is a great example of that because the owner hired a professional stager and I had the photographer take photos…but…

I just wasn’t happy. I didn’t feel the property would sell at its highest possible price based on that in person and online presentation. It was nice, the photos were “good” and better than most if not ALL other properties for sale. But they just didn’t tell the STORY of THIS condo well.

condo before after 1

condo before after table

condo view from sink

Kirkland Condofull set of before photos and the full set of after photos click on those links from the photographers site at HD Estates.

I use Brooke at HD Estates for my listing photos, and it was funny that when she first came she knew immediately that I had not staged the condo. She had done several of my properties this year, all of which I had staged myself, and she just knew. The tired old floor lamp with the fern…the granny orange shaw vs the red throw…the weeds on the table vs the art deco glass bowl…even in the bedrooms and bathrooms she just knew something wasn’t quite right. 🙂

I’m glad I went to the extra time, trouble and cost. The owner paid $92,700 for this condo just two years ago and we were able to sell it in less than a week with five offers at $233,000 with no home inspection contingency and no must appraise clause.

Might that same result have happened if I did not re-stage it myself and have the photos redone? I don’t really know for sure. What do you think?

Selling Your Home – 15 Good Photos

Gone are the days when you can advertise “must see!” to sell your home, as if people have to come into your house as the first step in the home buying process. You can scream that from the roof top all you want, but unless you have a location that would cause anyone and everyone to come to and into your home, it’s all about the photos.

So where do your start? You start with The Three Basics – Paint -Floorings – Clean

Home For Sale

Once you have your walls and floors together (see post linked above) you move to taking your “test photos”. Once you know which angles will end up in the 15 Photo Display, then you stage those “photo areas”. because it’s all about the 15 mls photos!

rkit

The cost to stage the above townhome was $2,500 BUT I staged it myself within the cost of Listing the home. I used that $2,500 as follows. $1,500 to refinish those now gleaming, satin finish hardwood floors on the main floor and $1,000 to have the place painted. We also put in all new carpet and the $1,000 to paint was for the main pro painter and did not include the prep-tape-helper. I use a painter who let’s me bring the “helper” myself, to save on cost.

Of course there are whole HGTV shows devoted to ALL of the steps that lead to FIFTEEN GREAT MLS PHOTOS.

I just try to give you a snapshot of the process…one blog post at a time. Both of the above homes are recent. The top one closed in December of 2012. The lower photos are of a Pending townhome over in The U-District. The top one sold in 1 day, the lower one in 2 days. The top one took SEVEN WEEKS to get ready for market. The lower one about THREE WEEKS.

So “SOLD IN ONE DAY” took from September 7th to October 25, 2013 to get it ready to list…and sold on October 26th as to Offer and Acceptance. The lower one “SOLD IN TWO DAYS” took from January 6, 2013 to Jan. 26 to get it ready to list…and sold on Jan. 28 as to Offer and Acceptance.

A few recent real life examples…to give you an idea of what it takes to get your house from Day One to SOLD.

The pain of over pricing and poor photos… and how not to get bit by them, 9+ questions to ask your listing agent.

I’ve noticed a trend in my business lately.  Several consumers are contacting our team for help in re-listing their home after having a poor experience with a prior agent.  While it is true that selling activity in Puget Sound is lower this year than last, there is still some positive selling activity occurring with some areas of Puget Sound continuing to grow in housing values.

So, with there still being some sales activity why is it that these folks are contacting us?

What I’ve seen as key factors in the lagging sales of these homes is poor pricing and presentation of the properties.  In one case the price had been overinflated by hundreds of thousands of dollars, plus it had poor presentation in photos and staging, so the home languished sitting on market for over a year.

In the majority of these situations things could have been handled differently with the past agent.  And, while I believe that me and my team provide a higher level of service than many others, we know we aren’t the only game in town that can figure out the right mix of marketing, presentation, and pricing for a property.  However, in these instances, I do believe the former listing agents could have done a better job – for certain – but, as a seller, it is also up to you to do a good job of interviewing a prospective agent.  A few good questions by the seller might have led to a different decision about how the house was marketed and led to a better discussion about what impacts the value of a home.  This, in turn, could have led to a more informed decision about where to place pricing.

So, to try and help those of you out there who are considering putting your home on the market, here is a list of 9+ questions you can use to qualify and interview your prospective listing agent.

1.   What methods of advertising do you use, and why?  Can you tell me which will likely be the most effective?  How comfortable are you using Internet advertising methods?

2.   Do you think my home will need prep work or staging to get it ready for market?  What types of things do you suggest for sellers and why?

3.   What is the typical timeline for selling a home that you have represented and how does that compare to the local marketplace?  What percentage of selling price do you typically get compared to list price?

4.  Do you offer any particular programs or services for each home that you sell such as a home warranty, professional photos, etc?  Does your fee determine whether additional services are included or not?

5.  If you don’t provide these additional services yourself – do you at least have companies you can refer me to that if I choose to use them directly to prepare my home more effectively, I can do so?

6.  Are there any special considerations I should have while selling my home such as security, prep for showings, etc?

7.  How often will you communicate with me about the sale of my home?  What kinds of reports can I expect?

8.  Will I get a chance to review and approve any of your advertising or marketing materials such as the flyer, MLS ad, or otherwise?  If not, why?  If I am not satisfied with a piece, will you work with me till I am?

9.  How will you determine the price that should be advertised for my home?  Will you include me in those pricing decisions and explain to me any reasoning for a price above or below my own estimate?

This list isn’t meant to be exhaustive but it will definitely open up a lot of good (or what should be good) conversation between you and the agent you are interviewing.  If the agent is unable to respond to any of these questions then you should seriously reconsider whether or not you will use him/her regardless of if it is a “family friend” or otherwise.  In today’s marketplace it is important that you make the right choice the first time, if you can.  The buying public is much more sophisticated today than even 10 years ago because of the Internet and because of the onslaught of home focused television shows and channels like HGTV.

Never Afraid to Tell It Like It Is…

I’ve been to several people’s homes in the last few weeks. Not to list the property now, but to give them that “to do” list they need to get their home ready for listing in late March or early April. Having that list a couple of months ahead of time is very helpful to my clients, as it gives them plenty of time to do things, and the confidence that they are doing the right things.

Having done a few of these in the last week, I wondered if I would approach the topic differently if this family greeted me at the door 🙂

desktop

Would I have boldly removed all of the knobs from those kitchen cabinets, the ones they just bought and spent hours putting there, thinking they looked great,

…to show them the cabinets actually looked better without them at all.

Would I have swept the 31 garish knobs into the kitchen drawer if Tony was the one who had just spent his time putting them on to the cabinets?

Often the hardest part of our job is delivering the hard truths. Then standing back to see if the owners will be receptive to the changes…or will they “shoot the messenger”? Perhaps growing up where that crew was just a bunch of comare to me, gives me the talent to boldly give people the hard truths, with no sugar coatings, that they need to get top dollar for their homes. I never thought about it that way until this morning. But I can honestly say I’d deliver the same news to Tony, like a caring paisano, that I do to my clients day in and day out.

Real Estate is not for Sissies…it’s a tough job and we often deliver the hard news. In fact, it’s why I got into the business in the first place. When I heard agents saying, “I let the market tell them”…”Oh, I couldn’t say THAT”, “I know it’s overpriced, but I’ll just let them sit on market for awhile until they “get” that”, I was honestly appalled!

Agents are often appalled at the things I do for my clients and say to my clients…I’m appalled that they don’t.

There IS crying in Real Estate. There’s no room in this market for agents who don’t want to tell their seller clients and buyer clients everything they know. I’m never afraid that someone is going to fire me.

It’s always better in my book for the messenger to get shot…than for the messenger to keep the message hidden in his pocket.

Do It Yourself Home Staging

This is a good example of what a homeowner can do by themselves to get their property ready for market. There are really only three things that will help a property sell. Location, Condition and Price. The only thing you can do anything about are condition and price. So make sure you do your best with condition, before considering a price change.

[photopress:jb2.jpg,full,center]

This 3 bedroom townhome in Brookwood Place in Bothell was already on the market with these before photos when Jeremy Keener and I arrived with nothing but a camera. We did not bring anything with us for staging this townhome to recreate the “stage” except what the owner already had in the townhome. Everything that was in the room is still in the room, just arranged a little differently.

[photopress:jerb2.jpg,full,center]

As you can see, this is the same room. The main change is to show the townhome’s best selling feature. By opening the blinds so that the photo in the mls shows the green out the window, a prospective buyer can readily see this prime feature. The “copy” did say it “backs to greenbelt”, but a picture speaks a thousand words. So we opened the blinds and let the greenbelt show.

[photopress:jdrbf_1.jpg,full,center]

Transforming the dining room was easy. Mostly we just moved the sofa, which you will see in the living room photos, so it wasn’t blocking the entrance to the dining area. The tall piece in the corner was moved up behind the folded out futon in the bedroom photo above. The owner had already placed the tablecloth, table runner and pictures.

[photopress:jerdr.jpg,full,center]

We ditched the folding chairs into a closet. The room is big and bright without the chairs, so we left it that way. We reversed the sofa and loveseat, but I couldn’t get the sofa corner to fit totally out of the dining room entryway, so we simply took the blanket throw from the back of the sofa and draped it to help camoflouge the dark sofa corner intruding on the dining entry space.

[photopress:jlrbf_1_2_3.jpg,full,center]

The living room was just too crowded with stuff. We pulled the big 3 foot ottoman out of the room and put it in the 3rd bedroom, which is on the main level and used as an office. We put the blue doggie bed in there also. We reversed the couch and loveseat to make more room walking into the dining area.

[photopress:jerlr.jpg,full,center]

We moved the coffee table into the center space between the couch and loveseat. We found the mantle items in other places, the center “picture” being a placemat. The throw pillows on the sofa ended up upstairs on the beds. We opened the blinds a tad to bring the green of the outdoors, inside. Other rooms were arranged as well, and it took less time to transform the townhome than it did to write this post.

Update on staging of house…

I put a post here the other day about staging a house and then saying I’d put in photos of the finished product to get responses from readers here (preferably readers and not regular contributors) about whether or not they could see the value and difference staging (and good preparation) makes in a sale. This listing got multiple offers and has a contract on it for more than asking price right now which was somewhat expected since we priced the home in the mid-range of what it could sell for based on our market analysis for the area.

[photopress:ExteriorFront_scp_070215_7486_400.jpg,thumb,alignright]

[photopress:LR_scp_070215_0043_400.jpg,thumb,alignright]

[photopress:Kit_Counter_scp_070215_0056_400.jpg,thumb,alignright]

[photopress:Dining_scp_070215_0051_400.jpg,thumb,alignright]

[photopress:Master_BD_scp_070215_0023_400.jpg,thumb,alignright]

[photopress:BD2_scp_070215_0029_400.jpg,thumb,alignright][photopress:BA2_scp_070215_0004_400.jpg,thumb,alignright]

Comments?  I have not posted every single photo but this gives a good layout of the house and most of the amenities it has to offer.

another day of staging…

Today was a busy day and another one that required a bit of handholding and education. We have been working with a client for several months now as they prepare a home for sale. The house has been a rental for several years and when I saw it in early December it was in not so great condition from a cosmetic standpoint. The former tenants had ruined the carpets in a scant 2 years of renting and there was plenty of cosmetic damage on things such as walls and doors where the teenaged daughters had vented their sibling rivalry.

You wouldn’t believe that this is the same house now.

I failed to take the photos I planned on today but I’ll post some of the “before” and “during” shots here and then I’ll follow those up later this week once we have the professional photographer’s work done. If anyone looks at this post, I’d really appreciate some feedback on whether you think me and the client did a good job. I’ve been offering a higher level of service to listing clients where we provide a lot of things such as professional cleanings, window washing (in & out), yard service, pro photos, and staging. I think it makes a big difference and I’d like to get your opinion too of whether going through this much work is worth it from the consumer’s point of view.

So, here are the beginning photos… stay tuned at the end of the week for the final shots…

front of the home – it needed some pruning, edging and trimming as well as a fresh layout of beauty bark.

Back yard photo – note the shrubs that have grown up high and are making the house look smaller than it is. The house needs plants that are more in keeping with the size and dimension of the home.

The kitchen and its cultured marble counter tops and older wall oven and gas stove top. Most people likely wouldn’t even notice but the stove top is too big for the space. Note how it goes past the fan above and is underneath the cabinet to the left. This is a fire hazard and was fixed when the house was updated for sale.

The living room carpet detail is hard to see here but let’s just say that it wasn’t the cleanest carpet I’ve ever seen. Lots of spots and stains. Underneath are what turned out to be really great oak floors as you can see a portion of them at the left corner of this photo. The floors were refinished prior to going on market this week. They look great and run throughout the length of the home in all bedrooms, hall, dining area and living room.

This is the 3rd bedroom just to give you an idea of how the room looked before since it is the smallest of the 3 regular bedrooms (not including the office that would likely qualify as a bedroom and has been used as such). We had the seller take out his home made bookcase, remove the dirty carpet, old trim and we had new doors installed.

A bit of staging magic goes a long way

This past weekend I attended a three hour class on staging. I was motivated to take the class because, as a real estate photographer, it helps to understand something about staging a property as agents frequently defer to me over last minute details of the home staging when I am on site doing the shoot. It’s not part of my job description but many agents have come to expect it and I do enjoy surveying a room and making simple, and quick, recommendations. I am fascinated by the psychology of staging and the dramatic changes staging can have on our perception and impression of a property.

Prospective buyers largely lack the imagination to see what one can do with a space so the seller, listing agent and/or stager need to provide it for them and hopefully do it well. In some cases it may be adding, subtracting or both. Immediately after my class I had a shoot that the listing agent had requested a few new photos as they had redone the staging since the original shoot. I think this is a great example of how a few changes really add considerably to the appeal of this condo. I especially appreciate the accent wall which was easy and inexpensive but really makes this condo, or at least the photo, look so much more inviting.

And to just pass along a tip to realtors from the class I took, get rid of dead vegetation in the landscaping. Especially in the front of the house. I walked by a home for sale in my neighborhood and I saw some dead plantings and I could see how detracting it was from the impression, or curb appeal, of the property.

I’d also recommend checking out Barb Schwarz’s existing book on staging and/or pre-ordering her new one that will be available in May.

Learn as much as you can about staging, regardless of who does it.

Your seller, (and photographer) will love you for it.

Before:
[photopress:after.jpg,full,centered]

After:
[photopress:before.jpg,full,centered]

Light Fixers – Before and After

As a follow up to Ardell’s post about finding those homes where the owners just didn’t take the time, or have the money/energy to bring the home to retail condition, I’d like to share a few before and after photos. These two sets of photo are from light fixers my wife and I rehabbed last year (our first two, actually). We put about $15K total into each property, and each sold within a week of listing.

[photopress:Kitchen_Before_right.2.jpg,full,alignleft]
[photopress:KitchenAfter.3.jpg,full,alignleft]

This first set of photos shows the before and after condition of the kitchen in a small rambler up in northeast Marysville. We used the existing cabinets, adding new pulls and hinges for a simple update. New paint, vinyl flooring, appliances and fixtures rounded out the upgrade.

This second set of photos shows how a little paint (and some nice staging) can go a long ways. This home is in Shoreline.

[photopress:Shoreline___Painted_Walls.1.jpg,full,alignleft]

[photopress:Dining_Nook___After.jpg,full,alignleft]

If we had chosen to do the work ourselves, we could have cut down total rehab costs to close to $10K. Now, on the other hand, as a preview for a future post on major rehabs, here’s a final before and after (total costs for this job in the $120K range). This one is on the market right now, but in the spirit of neutrality, I’m going to hold off on discussing this in detail until after it’s sold.

[photopress:Job_Pics_038.jpg,full,alignleft]

[photopress:Kitchen_2.0.jpg,full,alignleft]